shopping cart
Your shopping cart is empty
To the shopDrawer menu
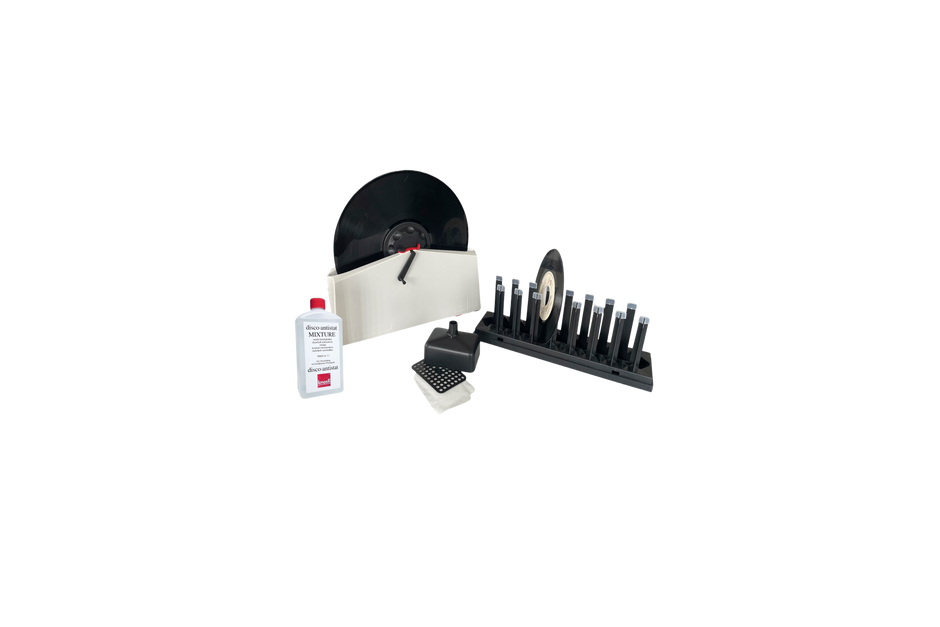


Our proven product with improved functionality.
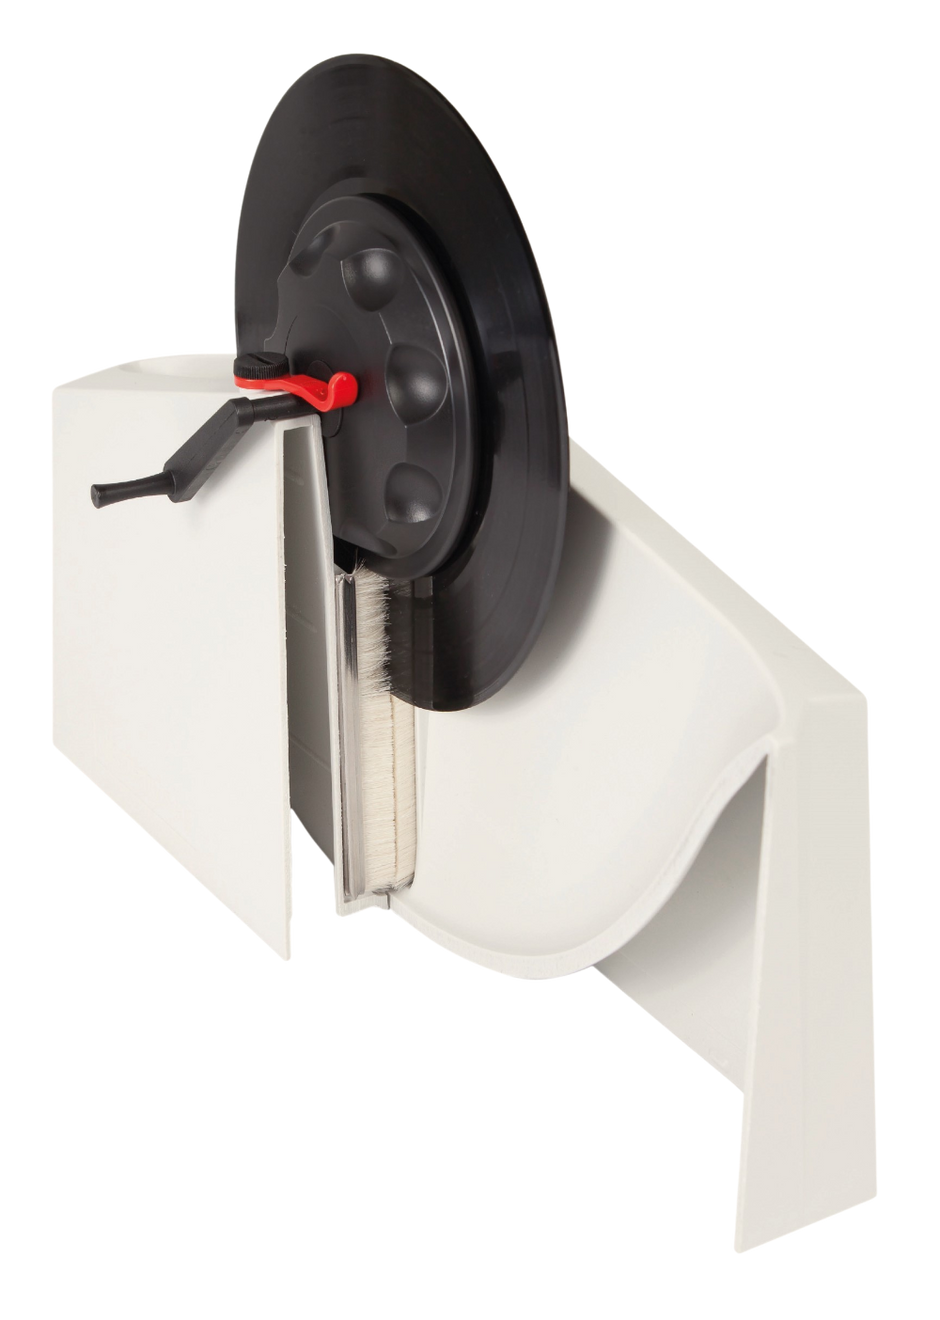
Practical care set for basic cleaning. Makes LPs permanently antistatic with the Disco-Antistat Mixture, a special fluid that automatically removes dust, dirt particles, and dried-on liquids, leaving no residue and deep into the grooves.
The care set consists of:
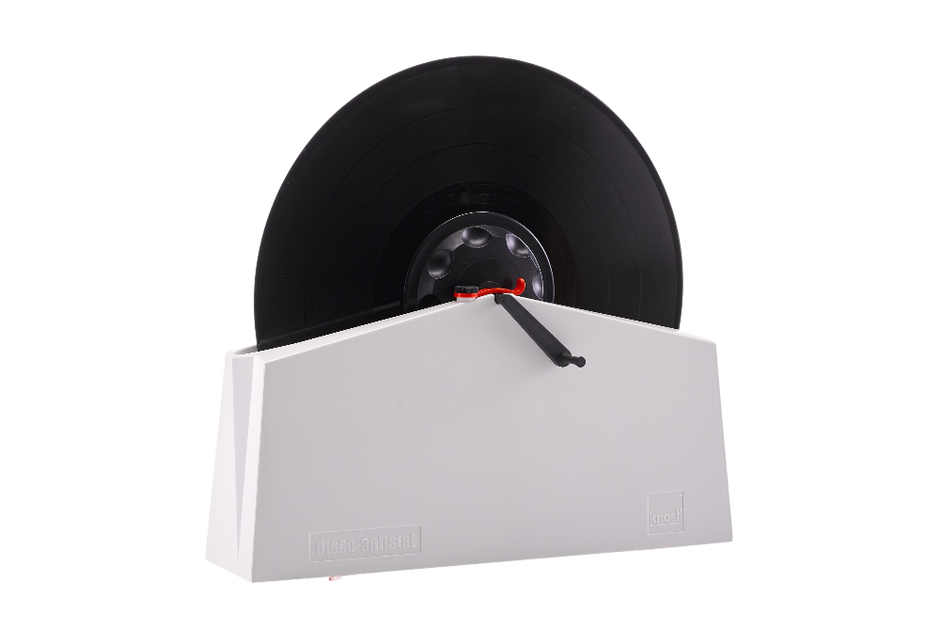
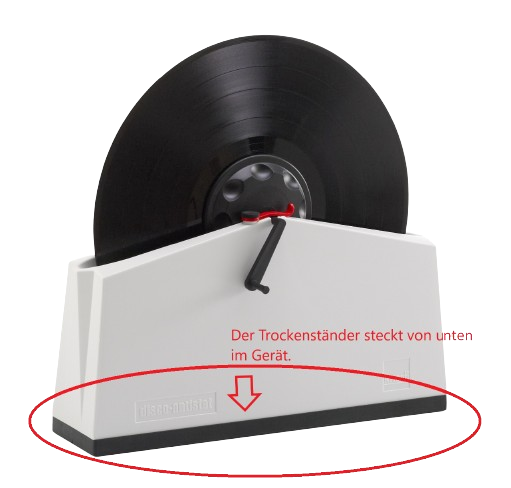
TIP! To save space, the device can be stored safely and compactly in our original Archifix box (item no. 1202431) .
Manufacturer: Knosti Phono-Zubehör-Vertriebs GmbH, Gewerbering 4, 86666 Burgheim Germany, E-Mail: info@knosti.de
Couldn't load pickup availability
Pay securely
Fast shipping
Free Support

Better sound quality
Dust and dirt not only affect the appearance of your records, but can also cause scratches and annoying noise. Regular care ensures that the sound remains clear and authentic - so you can enjoy your music in the best quality.
Longer lifespan
Records are delicate treasures. By cleaning them regularly, you protect them from wear and tear and damage that can be caused by dirt. This increases their lifespan and ensures long-term listening pleasure.
Increased value
Records that are well looked after not only retain their original value, but can even be more desirable for collectors. A well-preserved collection is a real gem - both for you and for potential buyers.
With the right care you can get the best out of your records!
The brush holders are made of stainless steel sheet. Due to the mechanical processing, however, tiny machining residues from the tools may remain on the holders (especially on the inside). This cannot be avoided during production, despite the highest quality standards.
Contact with corrosive liquids, including tap water, can cause an immediate chemical reaction, and the adhering metal particles can oxidize (rust). This rust then becomes visible as flash rust on the ends and/or surface of the brush holders. Under certain circumstances, this may also lead to a brownish discoloration of the goat hair.
The use of cleaning agents other than the products we recommend, Disco-Antistat Mixture (Art. No.: 1301000) and Disco-Antistat Ultraclean (Art. No.: 1302000), can also lead to oxidation on the brush holders.
Furthermore, we recommend storing the device in its packaging after use only when the brushes are completely dry. Storing the device with wet brushes can also lead to oxidation on the brush holders.
Generally, the oxidation of the brush holders does not affect the functionality of the washing machine, so you can continue using your device without concern. In most cases, surface rust stains can be easily wiped off with the rough side of a dry sponge.
Replacing the brushes is easy with Generation II PLUS washing machines. The brushes are available in the Disco-Antistat spare parts kit for Generation II PLUS (1350506).
For our Generation I Disco-Antistat washing machines, the ability to replace the brushes depends on the year of manufacture. Only washing machines manufactured from 2021 onwards offer the option of replacing the brushes. You can identify these machines by the two blind plugs on top of the tub. The Disco-Antistat replacement brushes (item no.: 1301120) are available separately as a set of two.
For washing machines manufactured before 2020, replacing the brushes was not yet possible. Removing the brushes can cause irreparable damage to the housing and/or the brushes and is therefore expressly not recommended!
It may happen that one or both brushes are relatively tightly seated in the housing and cannot be easily removed. This is completely normal and has various causes.
The plastic from which the cleaning trays are made is subject to a certain tolerance when cooling. Therefore, slight variations in dimensions can occur within very narrow limits. This is most noticeable in the brush guides, as the brushes are somewhat more difficult to install or remove in the lower tolerance range.
We use only goat hair for our cleaning brushes. Since naturally grown products are never exactly identical, there may be differences between the hairs, for example, in terms of hair diameter, so the brush heads may have slight differences in their thickness.
As soon as the goat hair comes into contact with water, it absorbs water and swells. It's therefore perfectly normal that the brushes may be a little harder to remove or install when wet.
In this case, the use of suitable tools, such as combination pliers or water pump pliers, is required to remove the brushes.
Using the pliers, grasp the brush firmly by the bristles slightly above the center, as close to the brush heads as possible. Be careful not to touch the brush guide in the cleaning tub. Then pull the brush vertically upwards out of the guide.
This problem usually occurs with devices where the brushes are already somewhat tightly seated in the housing, and removal may have required tools. Keep a suitable 4 mm flathead screwdriver handy for this purpose.
Then try out the different ways of installing the brushes (swapping right/left, turning the brushes around); this often makes it easier to install the brushes.
If the problem persists, select the configuration that allows the brushes to be pushed into the tray with the least resistance and push the brushes into the guides by hand as far as possible. Then, using a screwdriver, push the brushes into the guides from above until the brush holder is completely recessed into the guides of the cleaning tray. Be careful not to damage the guides with the screwdriver.
If a brush can no longer be installed even with the use of tools, check whether the brush has become distorted (e.g., due to improper disassembly). To do this, place the brush on a flat surface, such as a tabletop, and check whether it is fully supported or possibly wobbling. Don't forget to place the brush on its back. If the brush has become distorted, you can simply try bending it back into its correct shape.
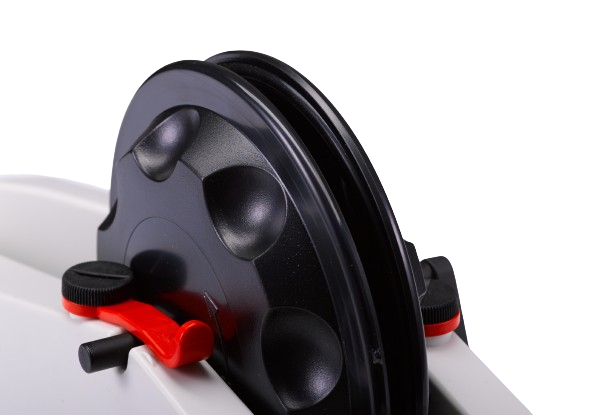
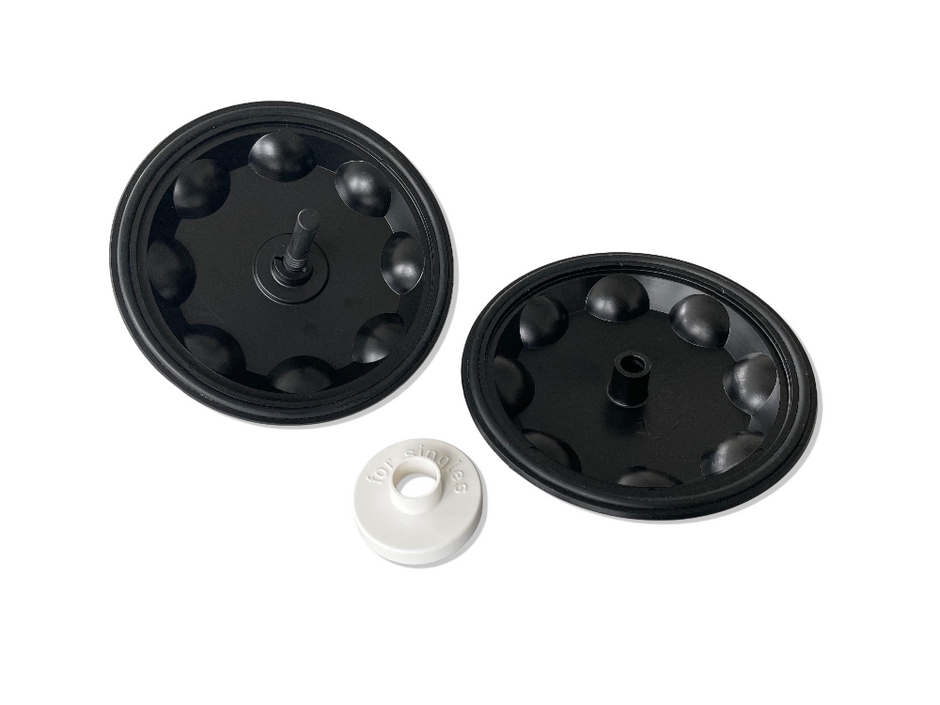
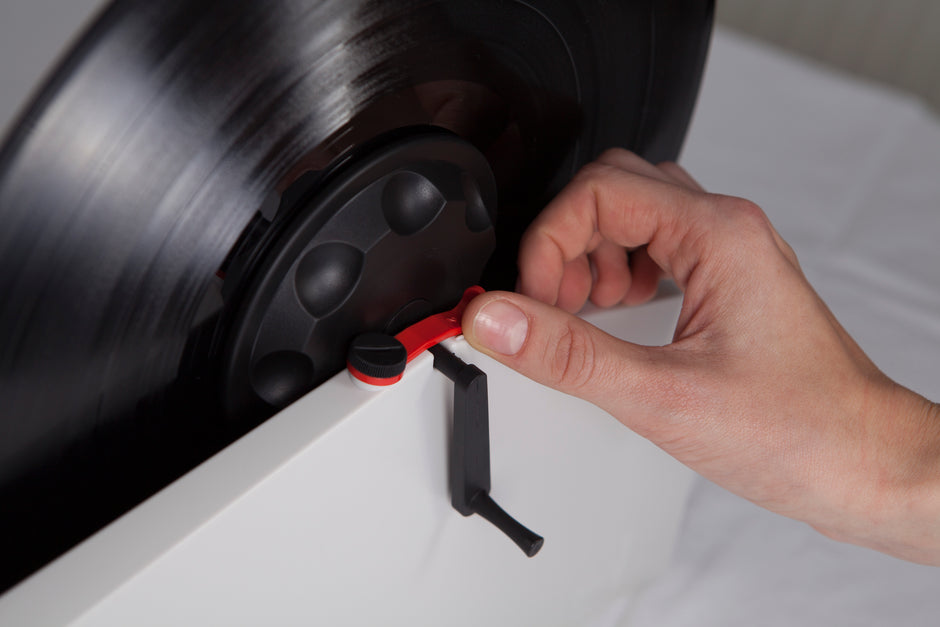
The rubber rings improve the adhesion between the protector and the record and reduce slippage during cleaning. They also provide a gentle cushioning effect, which can provide additional protection for the label surface and help distribute pressure more evenly—especially useful when using the crank or in automatic systems.
It is generally recommended to clean the washing machine after use before storing it away. It is also important to ensure that all components of the washing machine are completely dry before storing it, e.g., in the box. Cleaning should be carried out according to the included cleaning instructions.
To clean the tub of older Generation I washing machines (made before 2020) where the brushes cannot be removed, you will need approximately ½ liter of distilled water to rinse the tub. For Generation II Plus and Generation I washing machines manufactured from 2021 onwards, tap water can also be used to rinse the tub after removing the brushes from the housing. Soiling can be easily loosened and removed from the tub using a suitable brush or cloth.
Depending on the model, only use clean tap water or distilled water to clean the tub. Never use cleaning agents (e.g., soap, dishwashing liquid, chemical cleaners, etc.), as these may leave residue on the inside of the tub or damage the plastic/surface of the tub.
Always dry the housing, especially the inside, carefully with a cloth after rinsing with tap water to avoid residues (e.g. limescale) remaining in the cleaning tray!
Dirt, such as dust, is best removed while dry with your fingers, a small brush (e.g., a nail brush), or a paintbrush. The brushes can then be rinsed with distilled water.
If your washing machine allows it, we recommend removing the brushes for cleaning, as this makes cleaning much easier.
You'll need approximately 500 ml of cleaning fluid to fill the tray. When filling the washer, ensure that a small amount of air (3-5 mm) remains between the edge of the sealing tray/label cover and the cleaning fluid when the record is inserted. The label cover must never be immersed in the cleaning fluid, as this often causes the record label to become damp during cleaning.
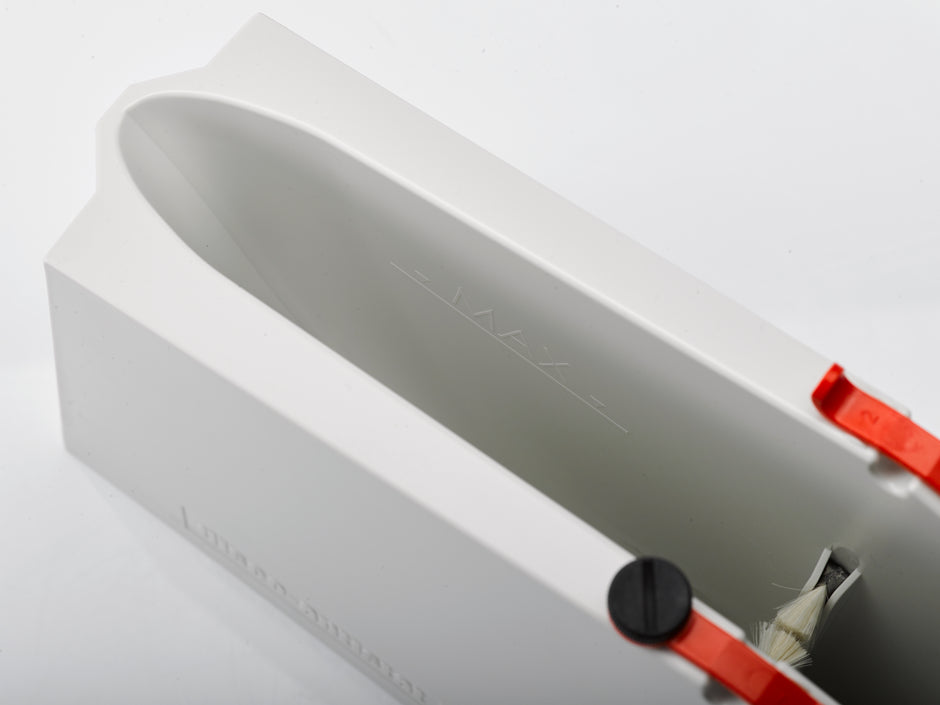
In newer devices, there is also a "MAX" marking in the tray, which indicates the maximum fill level when a record is inserted.
When filling the cleaning tank, please always keep in mind that different record sizes and pressing weights also result in different fluid displacement! Therefore, the level of cleaning fluid may vary depending on the record.
As a rule, wet labels are the result of a few easily avoidable operating errors:
In many cases, the cleaner level in the tub is simply too high, and the sealing cup is submerged in the cleaning fluid. In this case, simply pour some fluid out of the tub. In this context, also note the information under "How much cleaning fluid should be added to the tub?"
Often, the label cover is opened immediately after cleaning. This can cause any cleaning fluid still on the record to run over the label. To prevent this, hold the record at an angle of 30°-45° above the tray and wait until most of the cleaning fluid has drained from the vinyl. Once only a few drops of cleaner are dripping from the record into the tray, you can open the sealing tray and place the record in the drying rack for final drying.
Another common mistake is leaving the record wet while cleaning it in the tray. As long as the record rotates in the tray, the fluid runs along the groove to the right or left of the label. Once the rotation stops, it usually doesn't take long for the cleaner to run vertically down the record and collect at the edge of the label cover. This poses a risk that fluid could also get onto the label.
In most cases, the cleaner dries without leaving any residue on the record label, but depending on the material of the label, the printing ink used and other factors, stains, discoloration or similar may occur in individual cases.
This depends heavily on the pressing weight of the record. A higher pressing weight also affects the thickness of the record. The heavier the pressing, the thicker the record, as a rule. Since the distance between the brushes in the cleaning tray is always the same, higher friction forces are exerted on heavier (thicker) records. You therefore need more force to rotate the record between the brushes.
When using a Model II (PLUS) washer, it is important for technical reasons to observe the correct rotation direction. If the rotation direction is incorrect, there is a risk that the sealing bowl's screw connection will loosen during the cleaning process and the sealing bowl will open. Therefore, with Model II and Model II PLUS washer-discs, always rotate the record clockwise only!
With Generation I washing machines, however, this does not matter and you can turn the record in both directions for cleaning.
Yes, this is
easily possible.
As a general rule, you should clean all records with your Disco-Antistat cleaning device before playing them! Especially with used records, it's usually unknown how well they've been cared for, whether the LPs have been wet, or anything similar. This will hopefully ensure uninterrupted music enjoyment, as well as prevent unnecessary wear and tear on your record player.
Otherwise, cleaning your existing collection should be done as needed. There are a variety of factors that can play a role here:
- How carefully are the records handled?
- Is there any visible or audible contamination?
- What type of archiving was chosen?
- Do you smoke?
- Do you play the records often or rarely?
When in doubt, the rule of thumb "better once too much than once too little!" should apply, then you'll always be on the safe side.
Of course! Our first washing machine was
even specifically developed for the purpose of playing wet records without
to play without loss of quality. However, we would like to point out that
that with wet played records, several cleaning cycles may be necessary
are required to remove the caked-on dirt in the groove caused by wet running.
to completely remove dirt.
Absolutely! Even brand-new records are anything but clean!
Of course, a pressing plant isn't a clean room, but an industrial facility. Therefore, records often become contaminated during production. Paper fibers or dust from the inner sleeves can also transfer to the new record. You'll be amazed at the positive effect cleaning an LP freshly removed from its sleeve can have on the sound!
To prevent the record from becoming dirty again, we strongly recommend replacing each cleaned record with a new inner sleeve to prevent dirt from the inside of the sleeve from transferring to the newly cleaned record. We recommend using sleeves lined with antistatic film. This prevents static buildup on the records and also prevents the occurrence of so-called "paper scuffs" (fine abrasions on the surface of the vinyl) or "hairlines" (very thin, small scratches) caused by removing or inserting the record into or out of the sleeve.